Piped Rainbow Shortbread Cookies- Festive & Easy Recipe
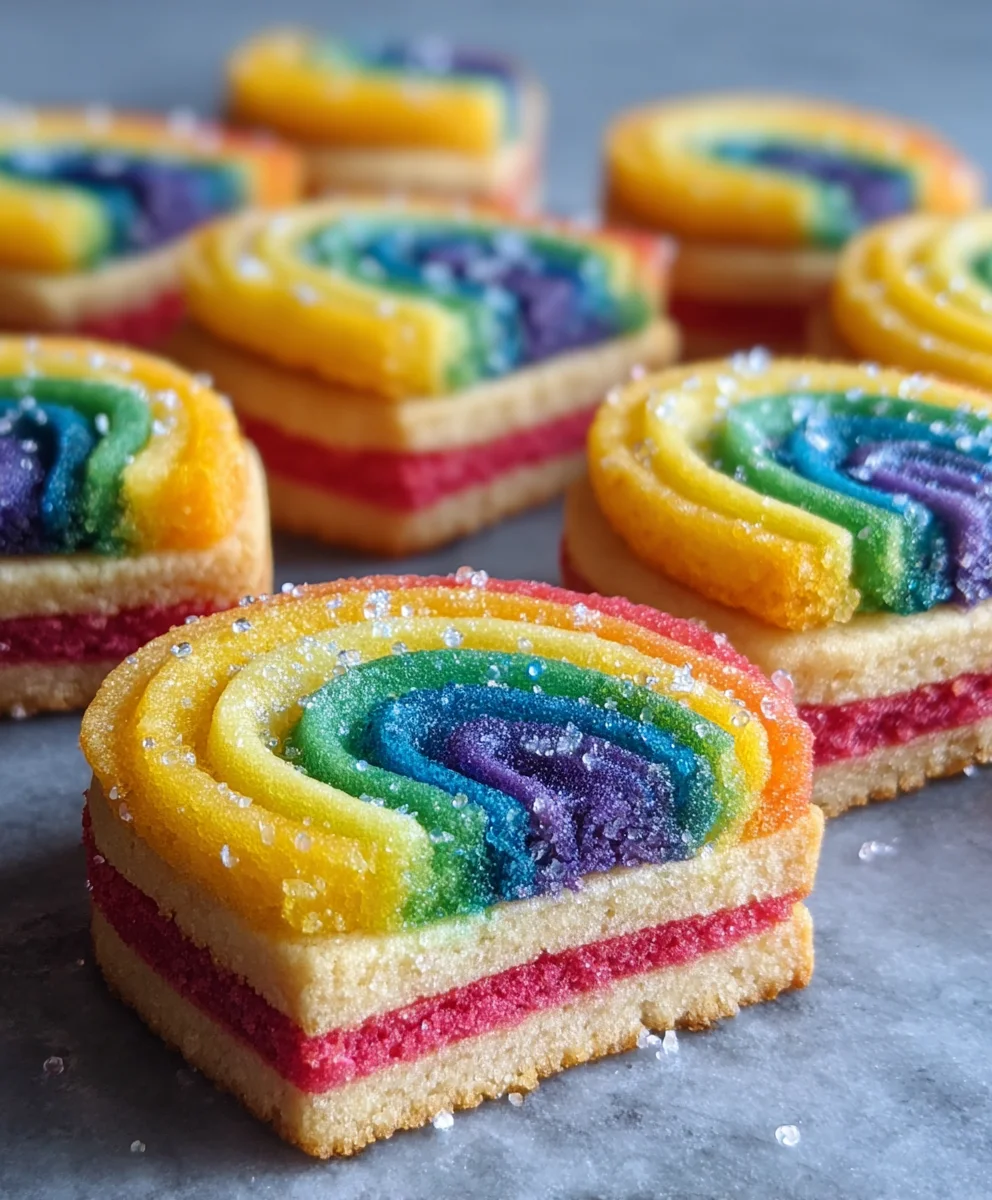
Piped Rainbow Shortbread Cookies are more than just a sweet treat; they are edible bursts of joy, miniature canvases of vibrant color that promise pure delight with every crum extractbly bite. Have you ever craved a cookie that not only tastes heavenly but also looks like a party in your mouth? That’s precisely the magic of these beauties. People adore them because they strike the perfect balance: a rich, buttery flavor that melts on your tongue, combined with a visual spectacle that’s impossible to ignore. What truly sets these Piped Rainbow Shortbread Cookies apart is the delicate art of piping. It transforms simple shortbread dough into an impressive display, making them ideal for celebrations, thoughtful gifts, or simply brightening up an ordinary afternoon. Get ready to impress yourself and everyone you share them with as we dive into creating these delightful, technicolor delights!
Ingredients:
- 2¼ cups all-purpose flour
- ¾ cup granulated sugar
- ¼ teaspoon salt
- 1 cup unsalted butter, softened and cut into ½-inch pieces
- Gel food coloring (choose at least 4 vibrant colors like red, orange, yellow, green, blue, purple)
- 1 cup white melting wafers
- Rainbow nonpareils, for decorating
Preparing the Shortbread Dough
Mixing the Dry Ingredients
Begin extract by combining the dry ingredients. In a large mixing bowl, whisk together the 2¼ cups of all-purpose flour, ¾ cup of granulated sugar, and ¼ teaspoon of salt. Whisking these together ensures that the salt and sugar are evenly distributed throughout the flour, which is crucial for consistent flavor and texture in your Piped Rainbow Shortbread Cookies. Set this mixture aside for a moment.
Creaming the Butter and Sugar
In a separate, larger mixing bowl, or the bowl of your stand mixer fitted with the paddle attachment, cream together the 1 cup of softened, unsalted butter and the ¾ cup of granulated sugar. Beat them on medium speed until the mixture is light and fluffy, typically about 3 to 5 minutes. This process incorporates air into the butter and sugar, which contributes to the tender crum extractb of the shortbread. Scrape down the sides of the bowl periodically to ensure all the butter and sugar are fully incorporated.
Combining Wet and Dry Ingredients
Gradually add the dry ingredients (flour, sugar, and salt mixture) to the creamed butter and sugar mixture. Mix on low speed until just combined. Be careful not to overmix at this stage. Overmixing can develop the gluten in the flour, leading to tough cookies. You want the dough to come together, and it should resemble rum extractrse crumbs at this point.
Dividing and Coloring the Dough
This is where the magic of the “rainbow” comes into play. Divide the dough into as many portions as you have colors of gel food coloring. For example, if you have four colors, divide the dough into four equal portions. To make this easier, you can weigh the total dough and then divide by the number of portions. Take each portion of dough and place it in its own separate bowl. Add a few drops of your chosen gel food coloring to each portion. Gel food coloring is recommended because it is highly concentrated and won’t add excess moisture to the dough, which could alter the cookie’s texture. Knead each portion of dough gently with your hands until the color is evenly distributed. You’ll want to wear gloves for this step to avoid staining your hands. The dough might feel a little sticky after coloring, but that’s perfectly normal.
Chilling the Dough
Once each portion of dough is beautifully colored, wrap each one individually in plastic wrap. Form each portion into a flattened disc before wrapping. This shape helps the dough chill more evenly. Refrigerate the dough for at least 1 hour, or until it is firm enough to handle without being overly sticky. Chilling the dough is a critical step; it firms up the butter, making the dough easier to pipe and preventing the cookies from spreading too much during baking. This will result in well-defined, beautifully shaped Piped Rainbow Shortbread Cookies.
Piping and Baking the Shortbread
Preparing the Piping Bag and Nozzle
Before you start piping, make sure your dough is sufficiently chilled. You’ll need a piping bag and a large, plain round piping tip (or a star tip if you prefer). Insert the piping tip into the piping bag. If you are using a large piping bag, you might want to have some assistance or carefully open the bag and fit it around the tip.
Piping the Rainbow Design
Now comes the fun part! Take one chilled, colored dough disc out of the refrigerator at a time (keep the others chilled). Break off small pieces of each color of dough and roll them into thin ropes or logs, about ¼-inch in diameter. The length of the ropes will depend on the size of your piping bag and the cookies you want to create. Carefully arrange these colored ropes side-by-side, pressing them gently together to form a multi-colored log. Try to keep the ropes as uniform in thickness as possible for a consistent appearance. Once you have a multi-colored log, gently feed it into the prepared piping bag. Pipe the dough onto a baking sheet lined with parchment paper. You can pipe them in simple rounds, swirls, or any shape you desire. Ensure you leave some space between the cookies as they may spread slightly. It’s a good idea to pipe a few practice cookies first to get a feel for the pressure and consistency.
Baking the Shortbread Cookies
Preheat your oven to 325°F (160°C). Place the baking sheet with the piped shortbread cookies into the preheated oven. Bake for 15 to 20 minutes, or until the edges of the cookies are lightly golden brown. The exact baking time will depend on the size and thickness of your cookies. Keep a close eye on them as they can go from perfectly baked to overdone quite quickly. You want them to be firm to the touch but not deeply browned.
Decorating the Shortbread
Melting the White Chocolate
While the cookies are baking, prepare your white chocolate for drizzling. Place the 1 cup of white melting wafers into a microwave-safe bowl. Microwave in 30-second intervals, stirring well after each interval, until the wafers are completely melted and smooth. Alternatively, you can melt them using a double boiler. Be careful not to overheat the melting wafers, as they can seize up and become difficult to work with.
Decorating with White Chocolate and Sprinkles
Once the cookies are baked, remove them from the oven and let them cool on the baking sheet for a few minutes before carefully transferring them to a wire rack to cool completely. Once the cookies are entirely cool, dip the tops of each cookie halfway into the melted white melting wafers. Allow any excess chocolate to drip back into the bowl. Immediately after dipping, sprinkle the still-wet chocolate with the rainbow nonpareils. You can also drizzle the melted white chocolate over the cookies using a fork or a piping bag with a fine tip, and then immediately sprinkle with the nonpareils. The nonpareils will adhere best to the melted chocolate. Allow the chocolate to set completely before storing or serving your Piped Rainbow Shortbread Cookies.

Conclusion:
And there you have it – a delightful journey into creating beautiful and delicious Piped Rainbow Shortbread Cookies! We’ve covered everything from carefully measuring your ingredients to achieving that perfect, crum extractbly texture and, of course, the artistic flair of piping those vibrant rainbow swirls. These cookies are more than just a sweet treat; they’re a centerpiece for any occasion, a delightful project for a rainy afternoon, or a thoughtful homemade gift that’s sure to bring smiles. Don’t be afraid to experiment with the colors and patterns to make them uniquely yours!
When it comes to serving, these Piped Rainbow Shortbread Cookies are fantastic on their own with a cup of tea or coffee. They also pair wonderfully with a scoop of vanilla ice cream or as a charming addition to a dessert platter. For variations, consider adding a hint of lemon zest to the dough for a citrusy twist, or perhaps a touch of almond extract for a more complex flavor profile. You could also experiment with different piping tips to create varied textures and designs.
I truly hope you enjoy making and sharing these Piped Rainbow Shortbread Cookies as much as I do. Remember, baking is all about having fun and getting creative in the kitchen, so embrace the process and don’t strive for absolute perfection – the slight imperfections often add to their charm!
Frequently Asked Questions:
Q1: My piped rainbow shortbread cookies spread too much during baking. What went wrong?
This is a common issue, and it usually stems from the dough being too warm or having too much leavening (though shortbread typically doesn’t use leavening). Ensure your butter is softened but not melted when creaming with sugar. Chilling the dough thoroughly before piping and then chilling the piped cookies again before baking can significantly help prevent spreading. Also, be careful not to overmix the dough after adding the flour, as this can develop gluten and lead to spreading.
Q2: Can I make the dough for Piped Rainbow Shortbread Cookies ahead of time?
Absolutely! The dough for Piped Rainbow Shortbread Cookies is excellent for making ahead. Once you’ve prepared the dough, wrap it tightly in plastic wrap and refrigerate it for up to 3 days. This chilling period actually helps to improve the flavor and texture. When you’re ready to bake, just let the dough sit at room temperature for a few minutes to make it easier to pipe. You can also freeze the shaped, unbaked cookies on a baking sheet until firm, then transfer them to a freezer-safe container for up to 2 months.
Q3: How should I store my Piped Rainbow Shortbread Cookies to keep them fresh?
To maintain the crispness and vibrant colors of your Piped Rainbow Shortbread Cookies, store them in an airtight container at room temperature. Avoid refrigerating them, as the moisture can make them soggy. If stored properly, they should stay fresh for about a week. If you notice any humidity building up in the container, you can place a small piece of parchment paper or a food-safe desiccant pack inside to absorb excess moisture.
Piped Rainbow Shortbread Cookies
Festive and easy shortbread cookies featuring vibrant piped rainbow designs and a sweet white chocolate coating.
Ingredients
-
2¼ cups all-purpose flour
-
¾ cup granulated sugar
-
¼ teaspoon salt
-
1 cup unsalted butter, softened and cut into ½-inch pieces
-
Gel food coloring (choose at least 4 vibrant colors like red, orange, yellow, green, blue, purple)
-
1 cup white melting wafers
-
Rainbow nonpareils, for decorating
Instructions
-
Step 1
Combine dry ingredients: In a large bowl, whisk together 2¼ cups all-purpose flour, ¾ cup granulated sugar, and ¼ teaspoon salt. Set aside. -
Step 2
Cream butter and sugar: In a separate bowl, cream 1 cup softened unsalted butter and ¾ cup granulated sugar until light and fluffy. Gradually add the dry ingredients and mix on low speed until just combined, resembling coarse crumbs. Do not overmix. -
Step 3
Divide and color dough: Divide dough into portions equal to the number of gel food colors. Add a few drops of gel food coloring to each portion and knead gently until evenly distributed. Wear gloves to avoid staining hands. -
Step 4
Chill dough: Wrap each colored dough portion individually in plastic wrap, flattening into discs. Refrigerate for at least 1 hour, or until firm enough to handle. -
Step 5
Pipe rainbow design: Roll small pieces of each colored dough into thin ropes. Arrange ropes side-by-side to form a multi-colored log. Feed the log into a piping bag fitted with a plain round tip. Pipe designs onto a parchment-lined baking sheet. -
Step 6
Bake cookies: Preheat oven to 325°F (160°C). Bake cookies for 15-20 minutes, or until edges are lightly golden brown. Let cool on the baking sheet for a few minutes, then transfer to a wire rack to cool completely. -
Step 7
Decorate: Melt white melting wafers. Dip cooled cookies halfway into melted chocolate, or drizzle. Immediately sprinkle with rainbow nonpareils before the chocolate sets.
Important Information
Nutrition Facts (Per Serving)
It is important to consider this information as approximate and not to use it as definitive health advice.
Allergy Information
Please check ingredients for potential allergens and consult a health professional if in doubt.