Crispy Cottage Cheese Chips-Easy Low Carb Snack
Cottage Cheese Chips are a revelation, a simple yet ingenious snack that’s taking the culinary world by storm. If you’ve ever found yourself craving something crunchy, savory, and satisfying without the guilt, then you’re in for a treat. What makes these cottage cheese chips so incredibly popular? It’s their cbeef hameleon-like versatility and surprising health benefits. Forget bland and boring; these chips are a blank canvas for flavor, easily adaptable to your taste buds’ wildest desires. They’re a fantastic alternative to traditional potato chips, offering a protein punch and a lighter, crisper texture that’s utterly addictive. We love them because they prove that healthy eating can be incredibly delicious and exciting. Get ready to discover your new favorite guilt-free indulgence!

Ingredients:
- 2 cups full-fat cottage cheese
- 2 large eggs
- 1/4 cup grated Parmesan cheese
- 1 teaspoon dried Italian seasoning
- 1/2 teaspoon garlic powder
- 1/4 teaspoon onion powder
- 1/4 teaspoon black pepper
- Pinch of salt (optional, as Parmesan is salty)
- Optional: A sprinkle of red pepper flakes for a little heat
Preparing the Cottage Cheese Base
The foundation of our delicious Cottage Cheese Chips lies in a simple yet effective batter. We start by ensuring our cottage cheese is as smooth as possible. If your cottage cheese has large curds, I highly recommend giving it a quick blitz in a food processor or blender for about 30 seconds to a minute. This step is crucial for achieving a uniform texture in your chips. You’re aiming for a creamy consistency, similar to thick sour cream. Once it’s smooth, transfer it to a medium-sized mixing bowl.
Next, we’ll add our binders and flavor enhancers. Crack the two large eggs directly into the bowl with the cottage cheese. The eggs will help bind the mixture together and contribute to a slightly chewier texture as the chips bake. Now, it’s time to bring in the savory elements. Add the grated Parmesan cheese. This isn’t just for flavor; the Parmesan also contributes to the crispiness of the chips as it melts and browns. Sprinkle in the dried Italian seasoning, garlic powder, and onion powder. These classic seasonings create an irresistible aroma and taste that pairs wonderfully with the cheesy base. Finally, add the black pepper and a pinch of salt, if you choose. Taste a tiny bit of the mixture before adding salt, as the cottage cheese and Parmesan can already be quite salty. If you’re feeling adventurous and want a touch of spice, now is the time to add a sprinkle of red pepper flakes.
Now, grab a whisk or a sturdy spoon and thoroughly mix everything together. You want to ensure that all the ingredients are completely incorporated. The mixture should be thick but still pourable. It will have a consistency similar to a very thick pancake batter or a thick yogurt. Don’t overmix, but make sure there are no pockets of unmixed egg or dry spices. This smooth, well-combined batter is now ready for the next stage.
Forming and Baking the Chips
This is where the magic happens, transforming our humble batter into crispy, dippable delights. Preheat your oven to 350 degrees Fahrenheit (175 degrees Celsius). It’s important to get the oven to the correct temperature before you start baking to ensure even cooking and crisping.
Line two large baking sheets with parchment paper. Parchment paper is your best friend here; it prevents sticking and makes cleanup a breeze. You can also use silicone baking mats if you have them.
Now, we need to get our batter onto the baking sheets in a way that creates individual chips. The best method I’ve found for this is to use a small cookie scoop or a tablespoon to drop mounds of the batter onto the prepared baking sheets. Leave about 2 inches of space between each mound, as the chips will spread slightly as they bake. Don’t make them too thick, or they won’t get as crispy. Aim for about a tablespoon of batter per chip.
Once you have your mounds of batter on the baking sheet, it’s time to flatten them out. This is crucial for achieving a chip-like texture. You can use the back of the spoon or a small spatula to gently spread each mound into a thin, round shape, about 3-4 inches in diameter. The thinner you spread them, the crispier your cottage cheese chips will be. Think of them like miniature, rustic crackers. Some might not be perfectly round, and that’s perfectly okay; rustic charm is part of their appeal!
Baking to Crispy Perfection
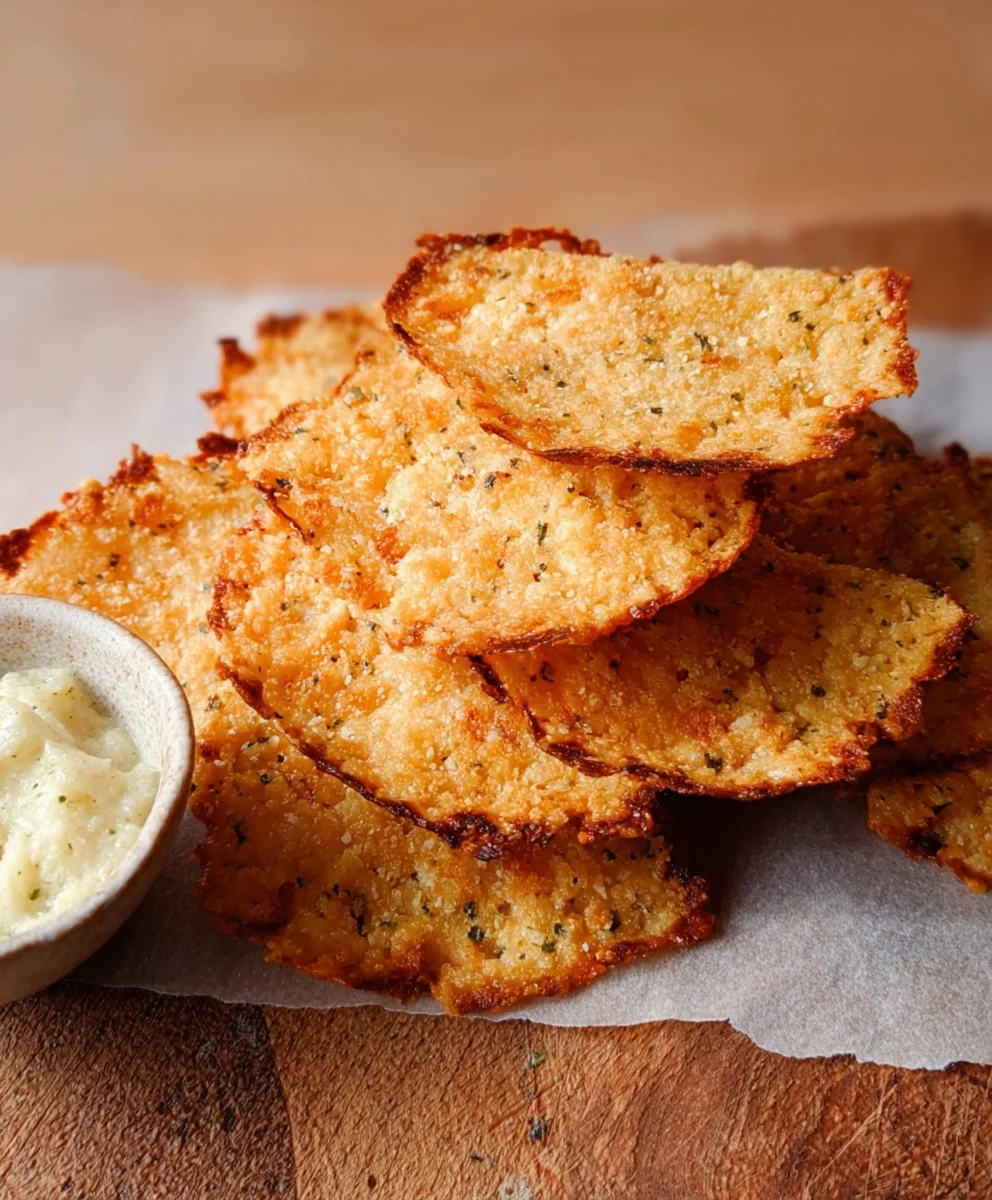
Place the baking sheets in the preheated oven. Bake for 20-25 minutes. The exact baking time will depend on your oven and how thinly you’ve spread the batter. You’re looking for the edges to become golden brown and crispy. The centers should also appear set and no longer wet.
About halfway through the baking time, around the 10-12 minute mark, you might want to rotate the baking sheets. This helps ensure even browning and crisping on both sheets, especially if your oven has hot spots. If you notice some chips browning faster than others, you can carefully remove them from the oven a few minutes earlier.
Once the chips have reached your desired level of golden-brown crispness, carefully remove the baking sheets from the oven. Let them cool on the baking sheets for about 5-10 minutes. This is an important step, as they will continue to crisp up as they cool. After this initial cooling period, gently transfer the Cottage Cheese Chips to a wire rack to cool completely. This allows air to circulate around them, further enhancing their crispiness and preventing any soggin extractess.
Once completely cooled, your Cottage Cheese Chips are ready to be enjoyed! They are best served within a day or two, stored in an airtight container at room temperature to maintain their crunch.
Conclusion:
You’ve now mastered the art of creating delicious and healthy Cottage Cheese Chips! This recipe offers a fantastic, high-protein snack that’s incredibly versatile and surprisingly easy to make. Whether you’re looking for a guilt-free alternative to traditional chips or a creative way to use cottage cheese, these Cottage Cheese Chips are sure to be a hit. Experiment with different seasonings and enjoy them on their own or paired with your favorite dips. We encourage you to get creative and make these your own – the possibilities are endless!
For serving, these Cottage Cheese Chips are wonderful on their own as a crunchy snack. They also make an excellent dipper for hummus, guacamole, or salsa. You could even crum extractble them over salads for added texture and protein.
Don’t be afraid to explore variations! Try adding a pinch of smoked paprika for a smoky flavor, or some dried herbs like rosemary or thyme for an herbaceous twist. A touch of garlic powder or onion powder can also elevate the taste significantly. For a spicier kick, incorporate some chili flakes into the cottage cheese mixture before baking.
Frequently Asked Questions:
Q1: Can I make Cottage Cheese Chips ahead of time?
Yes, you can definitely make Cottage Cheese Chips ahead of time. Store them in an airtight container at room temperature for up to 3-4 days. They will remain crispy for a good while if stored properly.
Q2: My Cottage Cheese Chips aren’t getting crispy. What am I doing wrong?
Ensure your cottage cheese is well-drained before mixing. Spreading the mixture very thinly on the baking sheet is also crucial for crispiness. Baking at the correct temperature and for the right amount of time, until golden brown and firm, is key. Sometimes, a slightly longer baking time at a slightly lower temperature can help achieve extra crispiness without burning.
Crispy Cottage Cheese Chips – Easy Low Carb Snack
A simple and delicious recipe for making crispy, low-carb cottage cheese chips that are perfect for snacking.
Ingredients
-
2 cups full-fat cottage cheese
-
2 large eggs
-
1/4 cup grated Parmesan cheese
-
1 teaspoon dried Italian seasoning
-
1/2 teaspoon garlic powder
-
1/4 teaspoon onion powder
-
1/4 teaspoon black pepper
-
Pinch of salt (optional)
-
Red pepper flakes (optional)
Instructions
-
Step 1
Ensure cottage cheese is smooth by blending if necessary until it resembles thick sour cream. Transfer to a mixing bowl. -
Step 2
Add eggs, grated Parmesan cheese, dried Italian seasoning, garlic powder, onion powder, black pepper, and salt (if using). Add red pepper flakes if desired. -
Step 3
Whisk or stir all ingredients thoroughly until well combined, creating a thick but pourable batter. -
Step 4
Preheat oven to 350°F (175°C). Line two baking sheets with parchment paper. -
Step 5
Drop mounds of batter (about 1 tablespoon each) onto the prepared baking sheets, leaving space between them. -
Step 6
Gently flatten each mound into thin, round shapes (about 3-4 inches in diameter). -
Step 7
Bake for 20-25 minutes, rotating the sheets halfway, until the edges are golden brown and crispy and the centers are set. -
Step 8
Let cool on baking sheets for 5-10 minutes, then transfer to a wire rack to cool completely before serving.
Important Information
Nutrition Facts (Per Serving)
It is important to consider this information as approximate and not to use it as definitive health advice.
Allergy Information
Please check ingredients for potential allergens and consult a health professional if in doubt.