Bunny Rabbit Cake-Easy Easter Dessert Recipe
Bunny Rabbit Cake is more than just a dessert; it’s a magical centerpiece that instantly brings smiles and a touch of whimsy to any occasion, especially Easter! There’s something undeniably charming about a cake shaped and decorated like a fluffy bunny, don’t you agree? It’s a recipe that has delighted children and adults alike for generations, evoking feelings of joy and celebration. What makes this Bunny Rabbit Cake so special is its versatility. You can customize it with your favorite cake flavors, frostings, and decorative touches, making each creation uniquely yours. Whether you’re a seasoned baker or looking for a fun family project, this recipe promises a delightful and delicious adventure, resulting in a show-stopping treat that’s almost too cute to eat!
Bunny Rabbit Cake
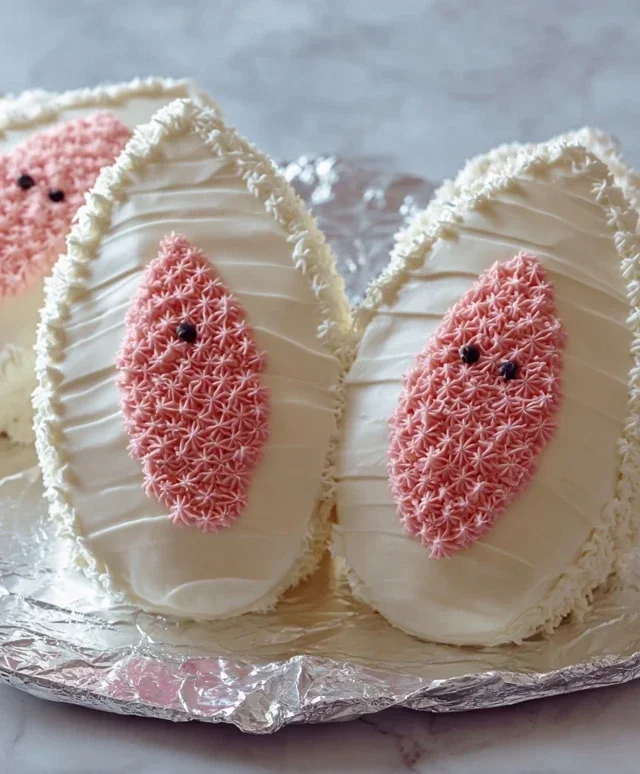
This Bunny Rabbit Cake is an absolute delight, perfect for Easter celebrations, birthdays, or simply to bring a smile to someone’s face. It’s a fun project that yields an adorable and delicious result. We’ll be creating a tender vanilla cake, shaping it into a charming bunny, and decorating it with fluffy buttercream. Don’t be intimidated by the shaping; it’s simpler than it looks, and even if it’s not perfectly symmetrical, the charm of a homemade bunny is undeniable!
Ingredients:
Preparing the Cake Layers
Let’s get started by preheating our oven to 350°F (175°C). We’ll also need to grease and flour two 8-inch round cake pans. This step is crucial to prevent our beautiful cake layers from sticking. For an extra layer of protection and a cleaner release, you can also line the bottoms of the pans with parchment paper circles. In a medium bowl, whisk together the all-purpose flour, baking powder, and salt. This dry ingredient mixture will ensure our cake has a light and airy texture. In a separate large bowl, cream together the softened unsalted butter and granulated sugar using an electric mixer. Beat them until the mixture is light and fluffy, which usually takes about 3-5 minutes. This creaming process incorporates air, which contributes to the cake’s tender crum extractb.
Next, add the eggs one at a time, beating well after each addition. Scrape down the sides of the bowl as needed to ensure everything is evenly incorporated. Stir in the vanilla extract. Now, we’ll alternate adding the dry ingredients and the milk to the wet ingredients. Begin extract by adding about a third of the flour mixture to the butter mixture and mix until just combined. Then, add half of the milk and mix again. Continue this process, alternating between the dry ingredients and the milk, ending with the dry ingredients. Be careful not to overmix at this stage, as overmixing can lead to a tough cake. Once everything is just combined, the batter should be smooth and pourable.
Divide the batter evenly between the two prepared cake pans. You can weigh the batter in each pan for perfect evenness, or just eyeball it. Smooth the tops with a spatula. Bake for 30-35 minutes, or until a wooden skewer or toothpick inserted into the center of the cakes comes out clean. Resist the urge to open the oven door too early, as this can cause the cakes to sink. Once baked, let the cakes cool in the pans for about 10-15 minutes before inverting them onto a wire rack to cool completely. It’s important that the cakes are entirely cool before frosting, otherwise, your frosting will melt and slide right off!
Making the Fluffy Buttercream Frosting
While our cake layers are cooling, let’s whip up a delicious and creamy buttercream frosting. In a large bowl, beat the softened butter with an electric mixer until it’s smooth and creamy. Gradually add the powdered sugar, one cup at a time, mixing on low speed until it’s incorporated. Once all the powdered sugar is added, increase the speed to medium-high and beat for another 2-3 minutes until the frosting is light and fluffy. This is where the magic happens!
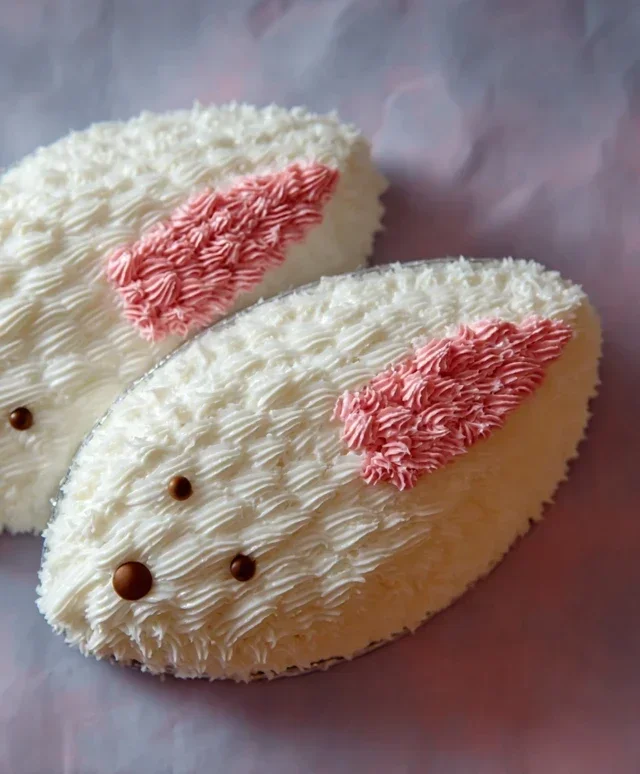
Now, add the milk and vanilla extract to the frosting. Start with a tablespoon of milk and add more, a teaspoon at a time, until you reach your desired consistency. You want a frosting that is spreadable but not too thin. If you want to create a pink hue for your bunny’s nose and inner ears, set aside a small amount of frosting and stir in a few drops of pink food coloring until you achieve the perfect shade. This simple touch adds a lot of character to our bunny!
Assembling and Decorating Your Bunny Rabbit Cake
This is the fun part where our cake transforms into a cute bunny! Once your cake layers are completely cool, place one cake layer on your serving platter or cake board. If your cake layers have domed tops, you can use a serrated knife to carefully level them so they are flat. This will make stacking and decorating much easier.
Now, spread a generous layer of your white buttercream frosting over the first cake layer. Place the second cake layer on top of the frosting. To create the bunny’s head, we’ll use one of the cake rounds. We’ll shape the body from the other cake round. You can cut a portion of the second cake to create the bunny’s ears and tail. A simple way to do this is to cut the cake round in half. Use one half as the bunny’s body. Then, cut the remaining half into two ear shapes. You can also cut a small circle for the tail. Don’t worry about perfection here; embrace the rustic charm!
Start by applying a thin “crum extractb coat” of frosting all over the cake. This is a thin layer of frosting that traps any loose crum extractbs. Chill the cake in the refrigerator for about 20-30 minutes until this layer is firm. This step is a game-changer for a smooth, professional-looking finish. Once the crum extractb coat is set, apply a thicker, more generous layer of frosting to cover the entire cake. Use an offset spatula to smooth the frosting and create a nice, even surface.
Now, let’s add the finishing touches! Use your reserved pink frosting to create the inside of the bunny’s ears and a little nose. For the eyes, you can use chocolate chips, small candies, or even just dots of frosting. If you have any extra frosting, you can pipe on a little tail or some decorative swirls around the cake. You can even use a fork to create some texture for the bunny’s fur. Get creative and have fun with it! This Bunny Rabbit Cake is sure to be a hit with everyone who sees it, and even more so when they take a bite! Enjoy your adorable creation!
Conclusion:
I hope you’re as excited as I am to try this delightful Bunny Rabbit Cake recipe! It truly is a fantastic way to bring a touch of whimsical fun to any celebration, from Easter gatherings to a child’s birthday party. The combination of a moist, flavorful cake base with its charming presentation makes it a guaranteed crowd-pleaser. I love how versatile this recipe is, allowing you to adapt it to your personal preferences.
This Bunny Rabbit Cake is wonderfully adaptable for serving. It’s perfect as is, showcasing its adorable design. However, you could also serve it with a dollop of fresh whipped cream, a drizzle of your favorite berry compote, or even a scoop of vanilla ice cream for an extra special treat. For variations, don’t be afraid to get creative! You can experiment with different cake flavors like lemon or chocolate, or even use a different frosting color to make your bunny unique. Feel free to add sprinkles, edible glitter, or even small candy carrots for decoration.
I wholeheartedly encourage you to give this recipe a try. It’s a rewarding baking experience that yields a truly memorable dessert. Seeing the joy on people’s faces when they see this sweet bunny is absolutely priceless!
Frequently Asked Questions:
Can I make this cake ahead of time?
Yes, you absolutely can! The cake layers can be baked a day in advance, cooled completely, and then wrapped tightly in plastic wrap before storing at room temperature. The frosting can also be made ahead and stored in an airtight container in the refrigerator. Just bring it to room temperature and give it a good stir before frosting the cake.
What if I don’t have piping bags for the frosting?
No problem at all! You can still achieve a lovely finish without piping bags. Use a spatula or a butter knife to spread the frosting smoothly over the cake. For the fur texture, you can gently swirl the frosting with the back of a spoon or a fork.
How can I store leftover Bunny Rabbit Cake?
Leftover cake can be stored in an airtight container at room temperature for 1-2 days, or in the refrigerator for up to 3-4 days. If refrigerating, allow it to come to room temperature before serving for the best texture and flavor.
Bunny Rabbit Cake
A charming and delightful bunny rabbit-shaped cake, perfect for Easter or any spring celebration. This cake is moist, tender, and decorated to resemble a cute bunny.
Ingredients
-
2 cups all-purpose flour
-
1 teaspoon baking soda
-
1/2 teaspoon salt
-
1 cup unsalted butter, softened
-
1 3/4 cups granulated sugar
-
2 large eggs
-
1 teaspoon vanilla extract
-
1 cup buttermilk
-
1/4 cup unsweetened cocoa powder
-
1/4 cup white vinegar
-
1/4 teaspoon pink food coloring
Instructions
-
Step 1
Preheat oven to 350°F (175°C). Grease and flour two 8-inch round cake pans. -
Step 2
In a medium bowl, whisk together the flour, baking soda, and salt. Set aside. -
Step 3
In a large bowl, cream together the softened butter and granulated sugar until light and fluffy. Beat in the eggs one at a time, then stir in the vanilla extract. -
Step 4
Gradually add the dry ingredients to the wet ingredients, alternating with the buttermilk. Mix until just combined. Do not overmix. -
Step 5
In a small bowl, whisk together the cocoa powder with 2 tablespoons of the batter. In another small bowl, combine the remaining batter with the pink food coloring and white vinegar. Stir until smooth. -
Step 6
Pour the pink batter into one prepared cake pan and the chocolate batter into the other. Bake for 30-35 minutes, or until a wooden skewer inserted into the center comes out clean. -
Step 7
Let the cakes cool in the pans for 10 minutes before inverting them onto a wire rack to cool completely. -
Step 8
Once cooled, carve the cakes to create a bunny shape (one round cake for the body, the other for the head and ears). Frost the entire cake with your favorite frosting and decorate to resemble a bunny.
Important Information
Nutrition Facts (Per Serving)
It is important to consider this information as approximate and not to use it as definitive health advice.
Allergy Information
Please check ingredients for potential allergens and consult a health professional if in doubt.