Rustic Bread Recipe – Easy Homemade Artisan Loaf
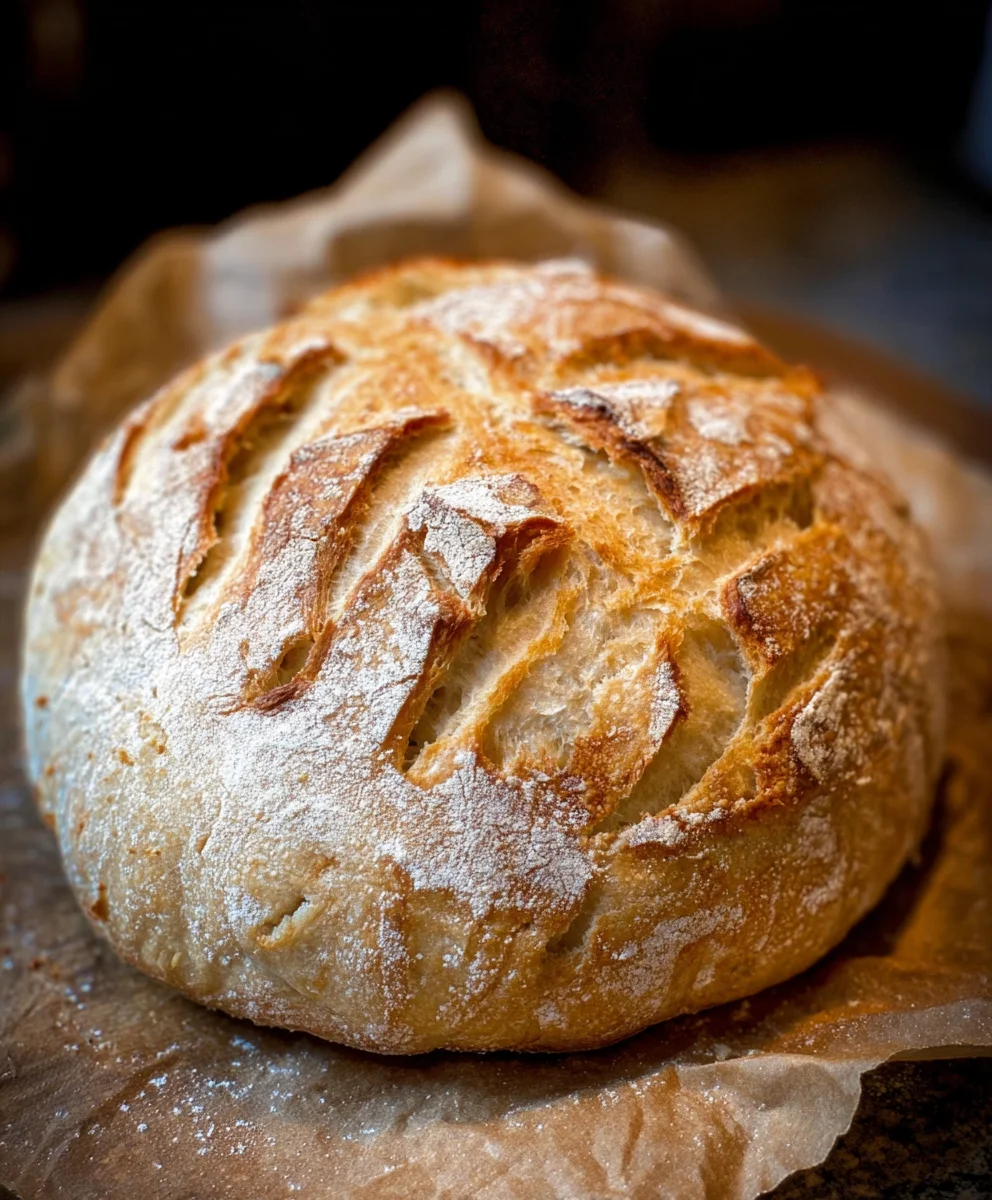
Rustic Bread Recipe: Are you ready to transform your kitchen into a haven of warm, comforting aromas and create a truly spectacular loaf? This Rustic Bread Recipe is more than just a baking project; it’s an invitation to experience the simple, profound joy of crafting something wholesome and delicious from scratch. Imagin extracte slicing into a golden-brown crust, revealing a soft, airy interior perfect for slathering with butter or dipping into your favorite soup. It’s no wonder people adore homemade bread – there’s an undeniable magic in its creation and a deep satisfaction in sharing it. What makes this particular Rustic Bread Recipe so special is its unpretentious elegance. It celebrates the beauty of basic ingredients, requiring minimal fuss but delivering maximum flavor and texture. It’s the kind of bread that feels both impressive enough for guests and comforting enough for a quiet afternoon snack. Get ready to impress yourself and your loved ones with this foolproof guide!
Ingredients:
- 3 cups warm water (around 105-115°F or 40-46°C)
- 2 ¼ teaspoons active dry yeast (this is typically one standard packet)
- 1 tablespoon sugar
- 6 cups (approximately 750 grams) all-purpose flour
- 3 teaspoons salt
The Art of Rustic Bread Making: Getting Started
This rustic bread recipe is designed to be straightforward, yielding a beautiful loaf with a satisfying crust and a wonderfully chewy interior. The magic lies in the simplicity of the ingredients and a little patience. We’ll start by awakening our yeast, which is the powerhouse behind this bread’s rise. In a large mixing bowl or the bowl of your stand mixer, combine the warm water, active dry yeast, and sugar. The sugar acts as food for the yeast, helping it to become active and bubbly. Gently stir this mixture and then let it sit undisturbed for about 5 to 10 minutes. You’ll know the yeast is ready when it becomes foamy and has a pleasant, slightly yeasty aroma. This foam is a visual indicator that the yeast is alive and ready to work its magic. If you don’t see any foam, your yeast might be old or the water might not have been the right temperature, and you’ll want to start this step again with fresh yeast.
Mixing and Kneading the Dough
Once your yeast mixture is happily foamy, it’s time to add the flour and salt. For this recipe, we’re using 6 cups of all-purpose flour, which you can measure by spooning it into your measuring cup and leveling it off, or by weighing it for greater accuracy (around 750 grams). Add the salt, which not only enhances the flavor of the bread but also helps to control the yeast’s activity. If you’re using a stand mixer, attach the dough hook and mix on low speed until the ingredients just come together. If you’re mixing by hand, use a sturdy spoon or your hands to incorporate the dry ingredients into the wet until a shaggy dough forms.
Now comes the most rewarding part: kneading. Kneading develops the gluten in the flour, which gives the bread its structure and chew. If you’re using a stand mixer, increase the speed to medium-low and let it knead for about 8 to 10 minutes, or until the dough is smooth, elastic, and pulls away cleanly from the sides of the bowl. It should feel slightly tacky but not overly sticky. To test if it’s sufficiently kneaded, you can perform the “windowpane test”: pinch off a small piece of dough and gently stretch it. If you can stretch it thin enough to see light through it without it tearing, your gluten is well-developed. If you’re kneading by hand, turn the dough out onto a lightly floured surface and knead by pushing the dough away from you with the heels of your hands, then folding it over and repeating. This process also takes about 10 to 12 minutes. You’re looking for that same smooth, elastic texture. Don’t be tempted to add too much extra flour during kneading; a slightly sticky dough is preferable to a dry one.
The First Rise: Letting the Dough Breathe
After kneading, shape the dough into a ball and place it in a lightly greased bowl. Turn the dough a couple of times to ensure it’s coated in a thin layer of oil, which prevents it from drying out. Cover the bowl tightly with plastic wrap or a damp kitchen towel. Find a warm, draft-free spot in your kitchen for the dough to rise. This can be on top of your refrigerator, in a slightly warm oven (turned off, of course!), or simply on your counter if your kitchen is warm enough. Let the dough rise for 1 to 1.5 hours, or until it has doubled in size. The exact time will depend on the temperature of your kitchen. You’ll notice it will become puffy and significantly larger. This “first rise,” also known as bulk fermentation, is crucial for developing the bread’s flavor and texture.
Shaping the Loaf: Giving it Form
Once your dough has achieved its impressive doubling, gently punch it down to release the trapped air. This process deflates the dough and prepares it for shaping. Turn the dough out onto a lightly floured surface. For a classic rustic loaf, you can shape it into a round (boule) or an oval (batard). To shape it into a round, gently flatten the dough into a rough disc, then fold the edges into the center and pinch them together. Turn the dough over so the seam is on the bottom and cup your hands around it, gently pulling it towards you to create surface tension and a smooth, taut top. For an oval shape, gently press the dough into a rectangle, then fold the top third down to the middle and the bottom third up over that, like folding a letter. Pinch the seams closed and gently roll it back and forth to elongate it into an oval. Place your shaped loaf onto a baking sheet lined with parchment paper or a well-floured tea towel for its second rise.
The Second Rise and Baking to Perfection
Cover the shaped loaf loosely with plastic wrap or a clean kitchen towel and let it rise again for another 45 minutes to 1 hour, or until it has increased in size by about 50-75%. While the dough is on its second rise, preheat your oven to 425°F (220°C). If you have a baking stone or steel, place it in the oven to preheat with it. A hot baking surface helps to create a fantastic crust. Just before baking, if you wish, you can lightly score the top of your loaf with a sharp knife or a lame. This helps control where the bread expands as it bakes, preventing blowouts and creating beautiful patterns. Carefully transfer your risen loaf to the preheated oven, either directly onto the hot stone/steel or onto the baking sheet. For an even better crust, you can create steam in the oven by placing a shallow pan of hot water on the rack below the bread during the first 10-15 minutes of baking. Bake for 30 to 40 minutes, or until the crust is a deep golden brown and the internal temperature of the bread reaches 190-200°F (88-93°C) when tested with an instant-read thermometer. The loaf should also sound hollow when tapped on the bottom. Once baked, remove the bread from the oven and transfer it to a wire rack to cool completely before slicing. This cooling period is essential for the crum extractb to set properly.

Conclusion:
And there you have it – your very own batch of incredibly satisfying Rustic Bread Recipe! This simple yet rewarding recipe brings the joy of homemade bread into your kitchen, with its beautiful crust and airy interior. We’ve covered everything from the initial mixing and kneading to the final, golden-brown bake. The aroma filling your home as this bread bakes is truly unparalleled. We encourage you to give this Rustic Bread Recipe a try; it’s a fantastic way to elevate your meals and impress your loved ones. Don’t be afraid to experiment and make it your own!
Serving this delightful bread is a pleasure in itself. It’s perfect alongside hearty soups and stews, makes an exceptional base for bruschetta, or simply enjoy it toasted with a generous smear of butter and a drizzle of honey. For variations, consider adding herbs like rosemary or thyme to the dough for an aromatic twist, or sprinkle some seeds onto the crust before baking for added texture and flavor.
Frequently Asked Questions about Rustic Bread Recipe:
Why is my Rustic Bread Recipe not rising properly?
Several factors can affect rising. Ensure your yeast is fresh and activated properly. The ambient temperature of your kitchen also plays a role; a warm environment is ideal for yeast activity. Over-kneading or under-kneading can also hinder the rise. Make sure you’re following the kneading times and descriptions carefully.
Can I make this Rustic Bread Recipe ahead of time?
Yes, you absolutely can! Once cooled, this Rustic Bread Recipe can be stored in an airtight container at room temperature for 2-3 days. For longer storage, it freezes beautifully. Wrap it tightly in plastic wrap and then in foil, and it will keep for up to 3 months. Thaw at room temperature or gently warm in the oven.
Rustic Bread Recipe – Easy Homemade Artisan Loaf
A straightforward recipe for a beautiful homemade artisan loaf with a satisfying crust and chewy interior.
Ingredients
-
3 cups warm water (around 105-115°F or 40-46°C)
-
2 ¼ teaspoons active dry yeast
-
1 tablespoon sugar
-
6 cups (approximately 750 grams) all-purpose flour
-
3 teaspoons salt
Instructions
-
Step 1
In a large mixing bowl, combine warm water, active dry yeast, and sugar. Stir gently and let sit undisturbed for 5-10 minutes until foamy. -
Step 2
Add all-purpose flour and salt to the foamy yeast mixture. Mix until a shaggy dough forms. Knead for 8-10 minutes (stand mixer) or 10-12 minutes (by hand) until smooth and elastic. -
Step 3
Shape the dough into a ball, place in a lightly greased bowl, cover, and let rise in a warm spot for 1 to 1.5 hours, or until doubled in size. -
Step 4
Gently punch down the dough, turn it onto a lightly floured surface, and shape into a round or oval loaf. Place on a parchment-lined baking sheet or floured tea towel. -
Step 5
Cover the shaped loaf loosely and let rise for another 45 minutes to 1 hour. Preheat oven to 425°F (220°C) during this time. -
Step 6
Score the top of the loaf if desired. Bake for 30-40 minutes, or until deep golden brown and an internal temperature of 190-200°F (88-93°C) is reached. Cool completely on a wire rack before slicing.
Important Information
Nutrition Facts (Per Serving)
It is important to consider this information as approximate and not to use it as definitive health advice.
Allergy Information
Please check ingredients for potential allergens and consult a health professional if in doubt.