Sweet Italian Christmas Cookies-Easy Festive Recipe
Italian Christmas Cookies are more than just a holiday treat; they’re a whispered promise of warmth, tradition, and pure joy delivered right to your kitchen. As the scent of these delightful confections begin extracts to waft through your home, you’ll understand why families across generations have cherished them. It’s the delicate balance of buttery richness and subtle sweetness, the way they melt in your mouth, and the simple elegance that makes these Italian Christmas Cookies an unforgettable part of any festive gathering. Each bite is a nostalgic journey, conjuring memories of gatherings past and the comforting embrace of loved ones. What truly sets them apart is their versatility; while classic recipes abound, they are the perfect canvas for your own creative flair, whether you choose to adorn them with vibrant icings or a scattering of festive sprinkles. Get ready to create your own cherished holiday traditions with this quintessential Italian Christmas Cookies recipe.

Ingredients:
- 4 large eggs
- 1 cup granulated sugar
- 1/2 cup unsalted butter, softened
- 2 teaspoons vanilla or almond extract (or a combination!)
- 3 1/2 cups all-purpose flour
- 4 teaspoons baking powder
- 2 cups powdered sugar
- 1/2 teaspoon vanilla extract (for the glaze)
- 3 tablespoons milk (for the glaze)
- Nonpareil sprinkles (in festive colors like red, green, and white for that quintessential Italian Christmas cookie look)
Getting Started: The Cookie Dough
Step 1: Creaming the Butter and Sugar
To begin extract crafting these delightful Italian Christmas cookies, the first crucial step is to create a light and fluffy base. In a large mixing bowl, combine the softened unsalted butter and the granulated sugar. Using an electric mixer (stand mixer with a paddle attachment is ideal, but a hand mixer works just fine), beat these two ingredients together on medium-high speed. You’re aiming for a pnon-alcoholic ale yellow, creamy consistency. This process incorporates air into the mixture, which contributes to the tender texture of your cookies. Scrape down the sides of the bowl occasionally to ensure everything is evenly incorporated. This usually takes about 3-5 minutes of consistent beating.
Step 2: Incorporating the Eggs and Flavor
Once the butter and sugar are beautifully creamed, it’s time to add the eggs. Add the eggs one at a time, beating well after each addition until fully incorporated. This gradual addition helps emulsify the mixture, preventing it from becoming oily. After the eggs are thoroughly mixed in, it’s time to infuse your cookies with wonderful flavor. Stir in the 2 teaspoons of vanilla or almond extract. You can use just vanilla for a classic taste, or go for almond for a more pronounced, festive aroma that pairs wonderfully with the holiday spirit. Alternatively, a combination of both extracts can create a wonderfully complex flavor profile.
Step 3: Combining the Dry Ingredients
In a separate medium bowl, whisk together the all-purpose flour and the baking powder. Whisking helps to distribute the baking powder evenly throughout the flour, ensuring consistent leavening for all your cookies. This step is simple but vital for preventing dense or unevenly risen cookies. Make sure there are no clumps of baking powder.
Stepgin extract Bringing the Dough Together
Now, it’s time to combine the wet and dry ingredients. Gradually add the flour mixture to the wet ingredients in the large mixing bowl. Mix on low speed until just combined. Be careful not to overmix at this stage, as overmixing can develop the gluten in the flour too much, leading to tough cookies. You want a soft, slightly sticky dough. If the dough seems excessively sticky and difficult to handle, you can add an extra tablespoon of flour at a time, but do so sparingly. Once the dough has just come together into a cohesive mass, it’s ready for chilling.
Shaping and Baking Your Italian Christmas Cookies
Step 5: Chilling and Shaping the Dough
Cover the dough tightly with plastic wrap and refrigerate for at least 1 hour, or until firm enough to handle. Chilling the dough makes it much easier to work with and prevents the cookies from spreading too much during baking. Once chilled, you can shape the dough in various ways. For traditional Italian Christmas cookies, roll small portions of the dough into ropes about 1/2 inch thick and then form them into rings, twists, or even simple circles. You can also use cookie cutters if you prefer more defined shapes. Place the shaped cookies onto baking sheets lined with parchment paper, leaving about 1-2 inches between them to allow for slight spreading.
Step 6: Baking to Perfection
Preheat your oven to 350°F (175°C). Bake the cookies for 8-12 minutes, or until the edges are lightly golden brown and the centers are set. The exact baking time will depend on the size and thickness of your cookies. Keep a close eye on them, as they can go from perfectly baked to slightly overdone quite quickly. Once baked, let the cookies cool on the baking sheet for a few minutes before transferring them to a wire rack to cool completely. This initial cooling on the baking sheet helps them firm up before you move them, reducing the risk of breakage.
Decorating Your Festive Italian Christmas Cookies
Step 7: Creating the Sweet Glaze
While your cookies are cooling, prepare the simple, sweet glaze. In a medium bowl, whisk together the powdered sugar and the 1/2 teaspoon of vanilla extract. Gradually add the milk, one tablespoon at a time, whisking until you achieve a smooth, pourable consistency. You’re looking for a glaze that’s thick enough to coat the cookies but thin enough to drizzle or dip easily. If the glaze is too thick, add a tiny bit more milk. If it’s too thin, add a little more powdered sugar.
Step 8: Decorating with Flair
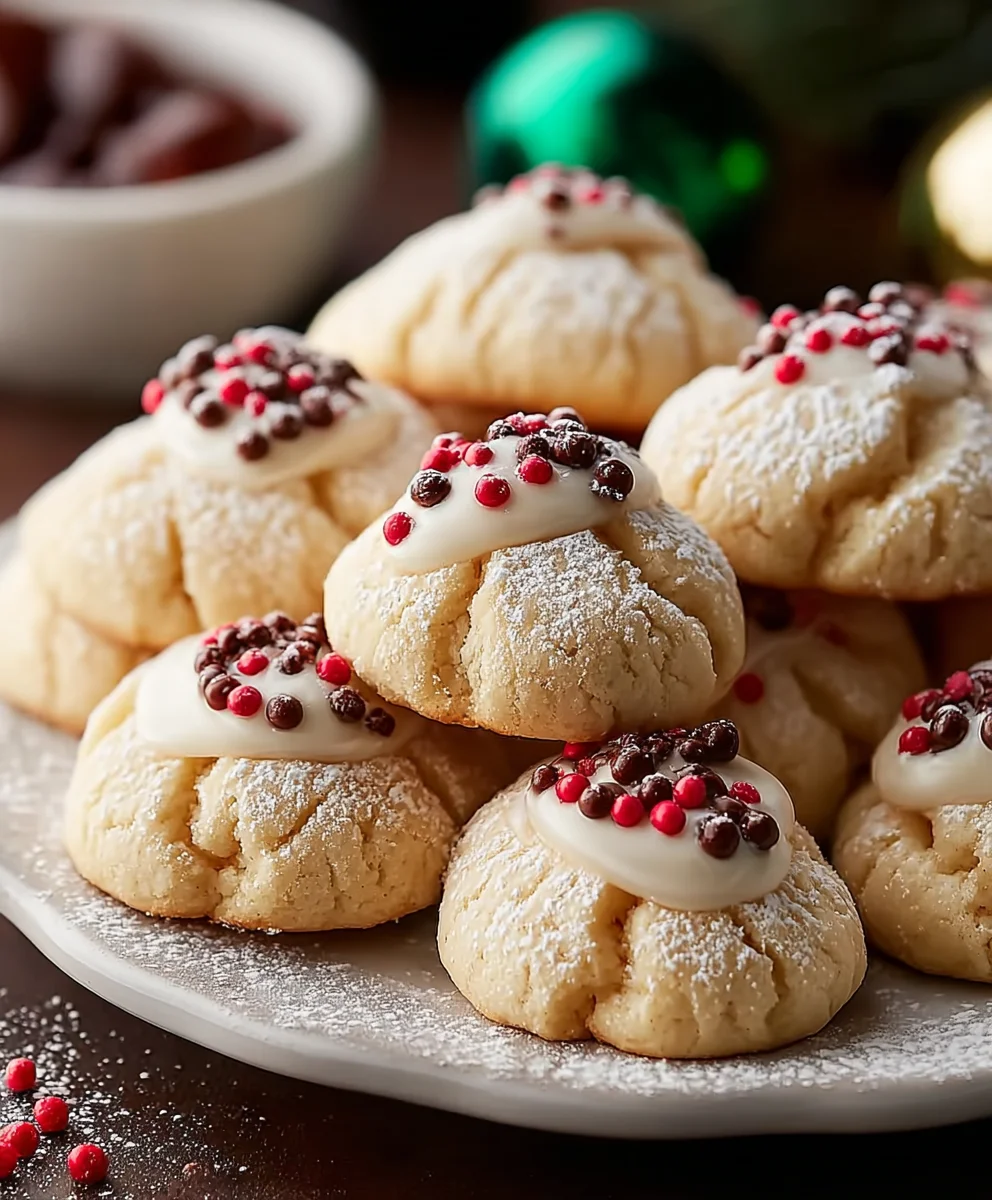
Once the cookies are completely cool, it’s time for the fun part – decorating! You can either dip the tops of the cooled cookies into the glaze, letting any excess drip off, or you can spoon the glaze over the tops. Immediately after glazing (while the glaze is still wet), generously sprinkle the nonpareil sprinkles over the cookies. The colorful nonpareils are what give these Italian Christmas cookies their iconic festive appearance. Use red, green, and white for a classic holiday look. Let the glazed cookies sit on the wire rack until the glaze has set completely. This can take a couple of hours, depending on the humidity. Once set, they are ready to be enjoyed or shared!
Conclusion:
There you have it – the ultimate guide to crafting delightful Italian Christmas Cookies! We’ve walked through each step, from selecting the finest ingredients to achieving that perfect, melt-in-your-mouth texture. These cookies are more than just a sweet treat; they’re a tradition, a symbol of warmth and festive cheer that brings families together year after year. Don’t be afraid to experiment and make them your own, but remember the essence of these classic Italian delights lies in their simple, comforting flavors.
I encourage you to gather your loved ones and embark on this baking adventure. The aroma filling your kitchen will be as joyful as the smiles on everyone’s faces as they enjoy these homemade treasures. Serve them with a steaming mug of coffee or hot cocoa, or perhaps alongside a glass of sweet dessert grape juice for an extra touch of elegance. For variations, consider adding a pinch of almond extract for a nuttier flavor, or a touch of lemon zest for brightness. You could also dip them in melted chocolate or sprinkle them with festive colored sugars before baking.
Frequently Asked Questions:
Q1: How should I store Italian Christmas Cookies?
To maintain their freshness, store your Italian Christmas Cookies in an airtight container at room temperature. They can last for up to a week when stored properly. If you plan to keep them for longer, you can freeze them in a single layer on a baking sheet until firm, then transfer them to a freezer-safe bag for up to 3 months.
Q2: Can I make the dough for Italian Christmas Cookies ahead of time?
Absolutely! The dough for Italian Christmas Cookies can be made up to 2 days in advance and stored in the refrigerator. This can actually enhance the flavor. Just bring the dough to room temperature for about 15-20 minutes before shaping and baking.
Sweet Italian Christmas Cookies-Easy Festive Recipe
Easy and festive Italian Christmas cookies that are perfect for the holiday season. These cookies are simple to make and feature a sweet glaze and colorful sprinkles.
Ingredients
-
4 large eggs
-
1 cup granulated sugar
-
1/2 cup unsalted butter, softened
-
2 teaspoons vanilla or almond extract
-
3 1/2 cups all-purpose flour
-
4 teaspoons baking powder
-
2 cups powdered sugar
-
1/2 teaspoon vanilla extract
-
3 tablespoons milk
-
Nonpareil sprinkles
Instructions
-
Step 1
In a large mixing bowl, cream together the softened unsalted butter and granulated sugar using an electric mixer until light and fluffy. This usually takes about 3-5 minutes. -
Step 2
Add the eggs one at a time, beating well after each addition until fully incorporated. Stir in the vanilla or almond extract. -
Step 3
In a separate bowl, whisk together the all-purpose flour and baking powder. -
Step 4
Gradually add the flour mixture to the wet ingredients, mixing on low speed until just combined. Do not overmix. The dough should be soft and slightly sticky. -
Step 5
Cover the dough tightly and refrigerate for at least 1 hour, or until firm enough to handle. Shape the dough into ropes and form into desired shapes like rings or twists. Place on a parchment-lined baking sheet. -
Step 6
Preheat oven to 350°F (175°C). Bake cookies for 8-12 minutes, or until edges are lightly golden brown. Let cool on the baking sheet for a few minutes, then transfer to a wire rack to cool completely. -
Step 7
Prepare the glaze by whisking together powdered sugar and vanilla extract in a bowl. Gradually add milk until a smooth, pourable consistency is achieved. -
Step 8
Once cookies are completely cool, dip or spoon the glaze over them. Immediately sprinkle with nonpareil sprinkles while the glaze is still wet. Let the glaze set completely.
Important Information
Nutrition Facts (Per Serving)
It is important to consider this information as approximate and not to use it as definitive health advice.
Allergy Information
Please check ingredients for potential allergens and consult a health professional if in doubt.